- Blue and White Notes
- Posts
- Tactics With Shaun #1 (Ipswich v Plymouth)
Tactics With Shaun #1 (Ipswich v Plymouth)
Find out where the spaces were and weren't when Ipswich faced Plymouth in October
SHAUN CALVERT regularly enlightens the Blue Monday Telegram group with his excellent post-match visual analysis of Ipswich’s games. This is (hopefully) the first of Shaun’s contributions which will be written up and archived on Blue and White Notes.
Recently, I was thinking about how different teams set about stopping Ipswich playing and specifically, how they either try to stop us at source (such as, from goal kicks) or look to stop our two centre midfielders from dictating the play through central areas and finally how they deal with our most creative attacking players (the three behind our #9 plus Leif Davis). Then, the very next day, along comes the studious copy-cat Steven Schumacher with his bold plan for the impressive Plymouth. At times it was like watching a mirror-image of how Ipswich play (the lop-sided 4-2-3-1, a high press, condensing the play, leaving limited numbers on the back line, quick transitions, defensive set piece set-up, etc.) and they certainly set their stall out in the first couple of minutes.
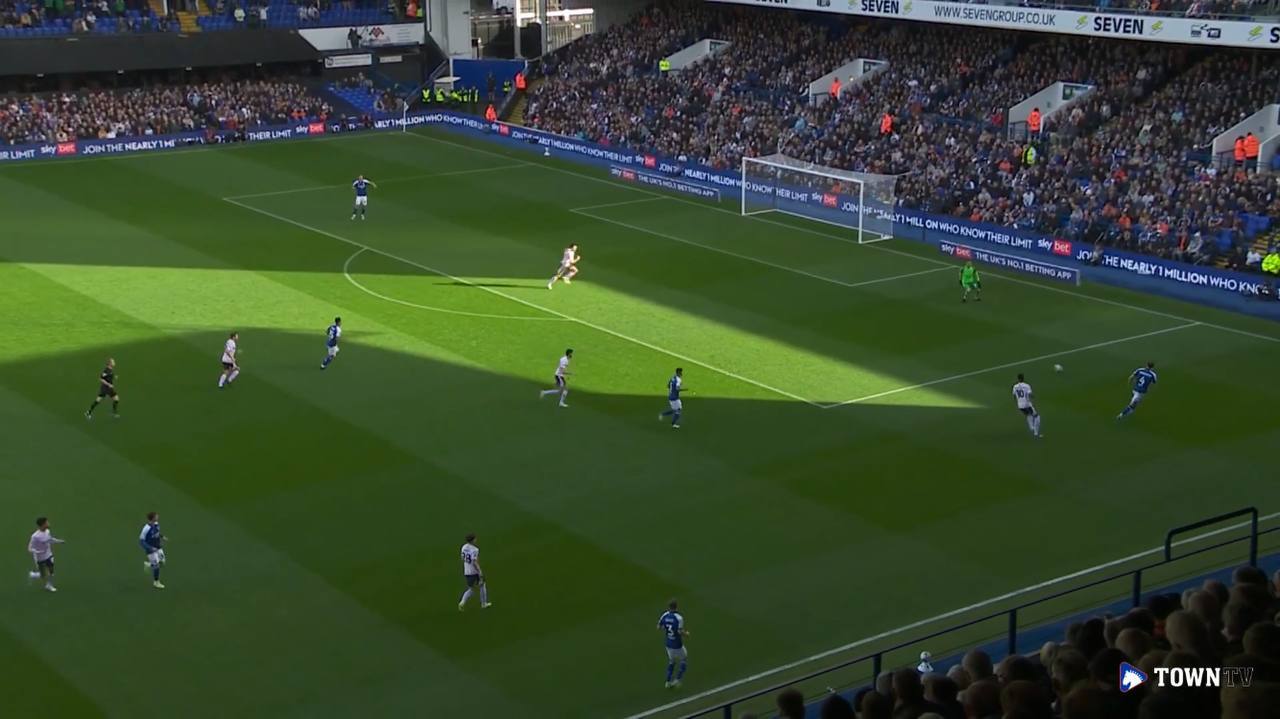
The key here for me is how they dealt with Broadhead and Davis, with this picture showing that it is the Right Back (#29 Kaine Kesler-Hayden) who has stepped in, tasked with tracking the former, and one of the Centre Midfielders (#28 Luke Cundle) going over to the latter on this occasion (not #10 Morgan Whittaker, who is busy pressing further up). At the start of every game, Ipswich will assess how the opposition are setting up and work out who the spare man is (in this still, Luke Woolfenden is signalling that he is) and thus where the space is.
You can see these patterns play out in these Video clips.
As it’s now been established that the Plymouth right back is going to step-in to pick up Broadhead when he comes into the ‘pocket’, we then enter a game of cat and mouse to see just how far the right back tracks him across the pitch and at which point he is handed over to or from the Plymouth centre midfielders (look out for their communication gestures).
If Kesler-Hayden does track him along way over, this is going to leave space in the vacant Plymouth right back area for Davis to exploit. One of the many great attributes of Broadhead is his intelligence in how to create the space and he is always scanning around, even when he is on the move, to see if he is being tracked or if anyone is around him or where his team mates are (keep an eye on his head movements in these clips or take a look the next time you are at a game).
The Plymouth centre midfielders will need to hold their central positions to stop us driving through the middle and cut off passing lanes and that will then leave Whittaker to track back and cover Davis (good luck with that!). You can also see just how many times that Davis is left free. Kieran McKenna spent a lot of time during the first 45mins shouting and gesturing for Ipswich to switch the play to Davis, when the play was condensed on the Ipswich right, as that was now where the spare man and space was.
The condensing of the play on the right hand side also gives us the opportunity for the pattern of play shown in this video, where Chaplin swings balls in behind the Plymouth left back.
Not only was Kesler-Hayden tasked with stepping-in to pick up Broadhead but he was also ‘inverted’ into midfield during some of the Plymouth in-possession build-ups, leaving him in a midfield defensive position for any transitions.
After the break, it looked like Plymouth then stopped using their right back to track Broadhead. Possibly because they were concerned about all the space down the left hand side. This seemed to be picked up straight away by Ipswich (or was something they tweaked at half –time anyway) and resulted in Davis having a higher starting position in our build-ups.
This resulted in Plymouth then sticking to an out of possession traditional back four (regardless of Broadhead’s positioning) but because we then had Davis and Hutchinson high and wide, the four were spread out across the pitch, rather than condensed.
This means that there is more space between each defender and it is more difficult for them to cover each other. This then resulted in the Town second goal, with Hirst saying in his post-match interview that this had been spoken about with Davis at half-time.
In the first picture, just before the goal, Woolfenden and Edmundson are seen pointing to Davis (the free man) just before Hladky picks him out with the pass. Then in the second picture, from behind the goal, you can see the positioning of Broadhead and Davis means that Kesler-Hayden can’t go to either so he is stuck in a conventional right back position.
So, that’s another team that have come to Portman Roadd with a plan but another one that has been solved by McKenna, his coaching staff and players before it could ‘come together’.
Reply